本文发布于Cylon的收藏册,转载请著名原文链接~


创建型模式

工厂模式

概念说明

工厂模式 (factory pattern) 是在父类中提供一个创建对象的方法,是用于创建不同类型的对象,而无需指定对象的真实的类

工厂模式的特点:

  • 对客户端隐藏对象创建的复杂逻辑
  • 可以通过修改工厂类来创建对象而不影响客户端代码
  • 提供创建对象的单一来源。 单个工厂类用以各组件保持一致性。
  • 允许子类创建对象类型

Factory_Pattern

图:工厂设计模式的示意图
Source:https://www.techcrashcourse.com/2015/10/factory-design-pattern.html

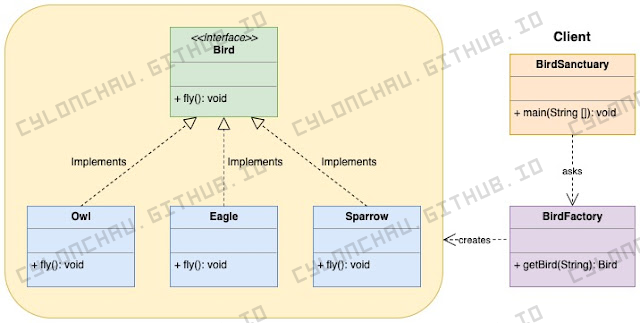
图片说明: Owl, Eagle, Sparrow 类都必须实现 Brid 接口, 该接口声明了一个名为 fly() 的方法。 每个类都将以不同的方式实现该方法。而使用工厂模式后的代码机构则为图所示,当 Owl, Eagle, Sparrow 实现了共同的接口,就可以将其对象传递给客户代码, 而无需提供额外数据。

而 “调用工厂方法的代码” 称为 “客户端代码”,这样可以做到 “不需要了解不同子类返回实际对象之间的差别”。客户端代码将所有 Brid Sanctuary 视为抽象的 Brid ,这样 ”客户端代码“ 知道所有鸟类对象都提供 fly() 方法, 但是并不关心其实现方式。

代码实现

brid.go

package main

type Brid interface {
    Fly()
}

Owl.go

type Owl struct {}

func (g *Owl) Fly() {
    fmt.Println("猫头鹰在飞")
}

Eagle.go

type Eagle struct {}

func (e *Eagle) Fly() {
    fmt.Println("鹰在飞")
}

Sparrow.go

type Sparrow struct {}

func (e *Sparrow) Fly() {
    fmt.Println("麻雀在飞")
}

创建一个工厂类 BridSanctuary.go

func BridSanctuary(type string) Brid { 
    if type == "Owl"{ 
     return  newOwl()
    } 

    if  type == "Eagle"{ 
     return  newEagle()
    } 

    if  type == "Sparrow"{ 
     return  newSparrow()
    } 
} 

客户端使用时通过工厂类获得不同的对象

sparrow := BridSanctuary("sparrow")
eagle := BridSanctuary("eagle")

工厂模式特点

  • 客户端代码使用工厂模式提供的创建对象,而不是直接使用 new 运算符创建对象。
  • 调用工厂对象并指定需要什么类型的对象。
  • 工厂模式在不暴露对象创建的复杂逻辑的情况下可以创建各种对象。
  • 工厂方法在将其类型转换为公共接口后,根据客户端代码的请求返回新创建的对象。
  • 客户端通过 Interface 与对象进行交互,但并不知道具体类的类型

抽象工厂

概念说明

抽象工厂模式 (Abstract Factory),是提供了一个 接口 或 抽象类创建一系列相关或依赖的对象,而不需要指定的具体类。抽象工厂模式,是工厂模式的超集,换句话说,抽象工厂是工厂的工厂,或者是工厂的wapper

Abstract_Factory_Pattern

图:抽象工厂设计模式的示意图
Source:https://www.techcrashcourse.com/2015/10/abstract-factory-design-pattern.html

代码实现

brid.go

type Brid interface {
	fly()
}

Owl.go

type Owl struct{}

func (g *Owl) fly() {
	fmt.Println("猫头鹰在飞")
}

func newOwl() Brid {
	return &Owl{}
}

Eagle.go

type Eagle struct{}

func (e *Eagle) fly() {
	fmt.Println("鹰在飞")
}

func newEagle() Brid {
	return &Eagle{}
}

Sparrow.go

type Sparrow struct{}

func (e *Sparrow) fly() {
	fmt.Println("麻雀在飞")
}

func newSparrow() Brid {
	return &Sparrow{}
}

Animal.go

type Animal interface {
    run()
}

Horse.go

type Horse struct{}

func (a *Horse) run() {
	fmt.Println("马在跑")
}

func newHorse() Animal {
	return &Horse{}
}

Lion.go

type Lion struct {}

func (a *Lion) run() {
    fmt.Println("狮子在跑")
}

func newLion() Animal {
	return &Lion{}
}

接下来创建 动物园的抽象工厂模式

type Zoo interface {
	GetBrid(t string) Brid
	GetAnimal(t string) Animal
}
// 抽象工厂的初始化
func FactoryCreator(t string) Zoo {
	if t == "EZooFactory" {
		return new(EZooFactory)
	}

	if t == "SZooFactory" {
		return new(EZooFactory)
	}
	return nil
}

实现两个动物园,EZoo 和 SZoo

type EZooFactory struct{}

func (e *EZooFactory) GetBrid(t string) Brid {
	if t == "Eagle" {
		return newEagle()
	}

	if t == "Sparrow" {
		return newSparrow()
	}
	return nil
}

func (c *EZooFactory) GetAnimal(t string) Animal {
	if t == "Lion" {
		return newLion()
	}
	return nil
}

SZoo

type SZooFactory struct{}

func (e *SZooFactory) GetBrid(t string) Brid {
	if t == "Owl" {
		return newOwl()
	}
	return nil
}

func (c *SZooFactory) GetAnimal(t string) Animal {
	if t == "Horse" {
		return newHorse()
	}
	return nil
}

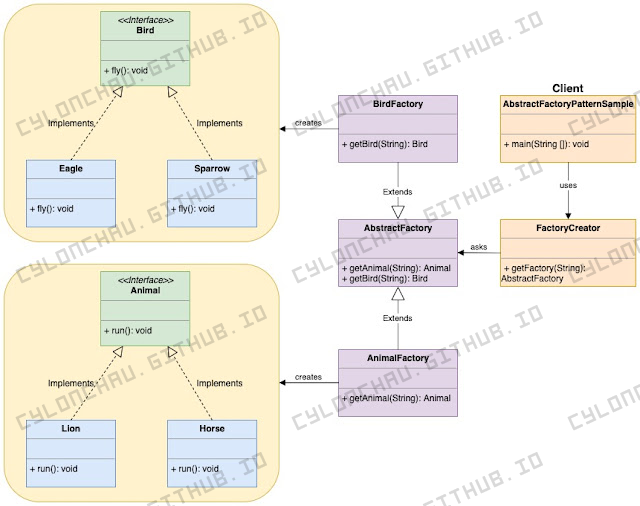
客户端代码,通过creator可以定义了创建不同动物园的类,而每个动物园有其独特的动物。换句话来说,客户端代码通过抽象接口,将工厂模式与实体柔和为一体,使客户端创建出的工厂类可以是任何动物的变体

func main() {
	e := FactoryCreator("EZooFactory")
	s := FactoryCreator("SZooFactory")
	e.GetBrid("owl")
	e.GetAnimal("Horse")
}

抽象工厂模式的特点:

  • 抽象工厂设计模式目的是为了创建一系列相关的对象,从而不依赖具体的每一个子类
  • 客户端代码并不知道使用了那个子类的工厂,首先工厂,然后调用具体方法获得具体的类
  • 抽象工厂是工厂模式的超集

工厂模式与抽象工厂模式比较

Factory Method Abstract Factory
当包含一个工厂类时,只能产生一种类型的对象 包含一个工厂类时,能够产生一系列的多种不同类型的对象
工厂类通过create方法实现接口 使用interface为工厂创建抽象类
子类决定了返回什么样的对象 每一种专门的工厂用于创建一种类型的对象,因此也被称为 “factory of factories”
一个工厂产生一种对象 一个广义的工厂,包含一或多个工厂,每个工厂可产生一种类型的对象

建造者模式

建造者 (Builder) 是一种使用相同的代码逐步构建复杂对象的方式,

假设一个复杂对象, 在对其进行构造时需要对诸多成员变量和嵌套对象进行繁琐的初始化工作。 这种场景的初始化代码通常是包含众多参数的构造函数中。例如,盖房子 House对象。 建造一栋简单的房屋, 首先需要建造四面墙和地板, 安装房门和一套窗户, 然后再建造一个屋顶。 但是如果想要一栋更大更明亮的房屋,还需要其他设施 (例如暖气,排水系统,供电系统,冷气系统)。

在这种场景下,建造者模式就应景而生,Builder 建议将对象构造代码从产品类中抽取出来, 并将其放在一个名为 Builder 的独立对象中。

solution1

图:Builder示意图/center>
Source:https://www.techcrashcourse.com/2015/10/abstract-factory-design-pattern.html

在这种情况下, 通过创建多个不同的Builder, 用不同方式实现一组相同的创建步骤。 然后你就可以在创建过程中使用这些Builder (例如按顺序调用多个构造步骤) 来生成不同类型的对象。

代码实现

Builder interface

type IBuilder interface {
    setWindowType()
    setDoorType()
    setNumFloor()
    getHouse() House
}

func getBuilder(builderType string) IBuilder {
    if builderType == "normal" {
        return newNormalBuilder()
    }

    if builderType == "igloo" {
        return newIglooBuilder()
    }
    return nil
}

一般房屋

package main

type NormalBuilder struct {
    windowType string
    doorType   string
    floor      int
}

func newNormalBuilder() *NormalBuilder {
    return &NormalBuilder{}
}

func (b *NormalBuilder) setWindowType() {
    b.windowType = "Wooden Window"
}

func (b *NormalBuilder) setDoorType() {
    b.doorType = "Wooden Door"
}

func (b *NormalBuilder) setNumFloor() {
    b.floor = 2
}

func (b *NormalBuilder) getHouse() House {
    return House{
        doorType:   b.doorType,
        windowType: b.windowType,
        floor:      b.floor,
    }
}

冰屋

type IglooBuilder struct {
    windowType string
    doorType   string
    floor      int
}

func newIglooBuilder() *IglooBuilder {
    return &IglooBuilder{}
}

func (b *IglooBuilder) setWindowType() {
    b.windowType = "Snow Window"
}

func (b *IglooBuilder) setDoorType() {
    b.doorType = "Snow Door"
}

func (b *IglooBuilder) setNumFloor() {
    b.floor = 1
}

func (b *IglooBuilder) getHouse() House {
    return House{
        doorType:   b.doorType,
        windowType: b.windowType,
        floor:      b.floor,
    }
}

房屋属性

package main

type House struct {
    windowType string
    doorType   string
    floor      int
}

工人

type Worker struct {
    builder IBuilder
}

func newWorker(b IBuilder) *Worker {
    return &Worker{
        builder: b,
    }
}

func (d *Worker) setBuilder(b IBuilder) {
    d.builder = b
}

func (d *Worker) buildHouse() House {
    d.builder.setDoorType()
    d.builder.setWindowType()
    d.builder.setNumFloor()
    return d.builder.getHouse()
}

客户端代码实现,即建造房屋

func main() {
    // 定义房屋的类型
    normalBuilder := getBuilder("normal")
    iglooBuilder := getBuilder("igloo")
	
    // 请工人盖房子
    worker := newWorker(normalBuilder)
    normalHouse := worker.buildHouse() // 设置工人需要施工的方向,即要盖什么类型的房子

    fmt.Printf("Normal House Door Type: %s\n", normalHouse.doorType)
    fmt.Printf("Normal House Window Type: %s\n", normalHouse.windowType)
    fmt.Printf("Normal House Num Floor: %d\n", normalHouse.floor)

    worker.setBuilder(iglooBuilder)
    iglooHouse := worker.buildHouse()

    fmt.Printf("\nIgloo House Door Type: %s\n", iglooHouse.doorType)
    fmt.Printf("Igloo House Window Type: %s\n", iglooHouse.windowType)
    fmt.Printf("Igloo House Num Floor: %d\n", iglooHouse.floor)

}

prototype

模式概念

prototype 这种设计模式,提供的是一种复制现有对象的模式,在这种模式下不需要重复的构建对象。

prototype 的特点有:

  • 客户端代码克隆对象时,客户端并不知道它获得的对象类型,而需要指定其对象类型
  • 提高了系统性能;对于资源密集型操作的对象,可以通过克隆来减少创建成本
  • 隐藏了客户端代码创建新示例的复杂性
  • 该类型主要的体系就是在clone() 上

选择 prototype的场景

  • 当创建对象很复杂时,或需要大量的资源操作时
  • 当想对客户端隐藏创建逻辑时
  • 当一个类有多种状态,可以通过先全部创建,用时克隆来提高效率

代码的实现

brid.go

type Brid interface {
	fly()
    Clone() Brid
}

Owl.go

type Owl struct{
    Name string
}

func (g *Owl) fly() {
	fmt.Printf("猫头鹰 %s 在飞\n", g.Name)
}

func (g *Owl) clone() Brid {
    return &Owl{Name: g.Name}
}

func newOwl() Brid {
	return &Owl{}
}

Eagle.go

type Eagle struct{
    Name string
}

func (e *Eagle) fly() {
	fmt.Printf("鹰 %s 在飞\n", e.Name)
}

func (g *Eagle) clone() Brid {
    return &Eagle{Name: g.Name}
}

func newEagle() Brid {
	return &Eagle{}
}

Sparrow.go

type Sparrow struct{
    Name string
}

func (e *Sparrow) fly() {
	fmt.Printf("麻雀 %s 在飞\n", e.Name)
}

func (g *Sparrow) clone() Brid {
    return &Sparrow{Name: g.Name}
}

func newSparrow() Brid {
	return &Sparrow{}
}

prototype 类,使用 BridsFactory 对象来创建 Parrot、Sparrow 和 Eagle 等类的对象。

type BridsFactory struct {
    children []Brid
    name     string
}

func (b *BridsFactory) print(indentation string) {
    fmt.Println(indentation + b.name)
    for _, i := range f.children {
        i.fly()
    }
}

func (b *BridsFactory) clone() BridsFactory {
    clonBrid := &Brids{name: b.name + "_clone"}
    var tempChildren []Brid
    for _, i := range f.children {
        copy := i.clone()
        tempChildren = append(tempChildren, copy)
    }
    clonBrid.children = tempChildren
    return clonBrid
}

客户端代码

func main() {
    brid1 := &Owl{name: "jackchan"}
    brid2 := &Eagle{name: "calenlee"}
    brid3 := &Sparrow{name: "jerrywong"}

    brids1 := &BridsFactory{
        children: []Brid{brid1, brid2, brid3},
        name:     "owls",
    }

    cloneBrids := brids1.clone()
    fmt.Println("\nPrinting hierarchy for clone Brids")
    cloneBrids.print("  ")
}

单例

概念说明

单例 (Singleton) 模式主要特点是确保一个类只能创建一个对象,其提供了一种只能创建一个对象的方法。

单例模式的特点:

  • 确保一个类只能创建的一个实例
  • 通常情况下构造函数是私有的,以防止通过new来创建多个实例
  • 类似静态的构建函数的方法,它将提供了一种调用私有构建函数来创建出对象并保存在静态字段中,后续所有的构建调用都会返回唯一的这个静态对象

代码实现

type single struct {}

var singleInstance *single // 定义一个静态字段

func getInstance() *single {
    if singleInstance == nil { // 当这个“静态变量”为空时,则创建这个对象,已确保只能被初始化一次
        if singleInstance == nil {
            fmt.Println("Creating single instance now.")
            singleInstance = &single{}
        } else {
            fmt.Println("Single instance already created.")
        }
    } else {
        fmt.Println("Single instance already created.")
    }

    return singleInstance
}

客户端代码

func main() {

    for i := 0; i < 30; i++ {
        go getInstance()
    }
}

结构模式

适配器

适配器设计模式 (Adapter),是一种结构设计模式,主要是使具有不兼容接口的对象可以进行协作;通俗来讲,是将一个类的接口转换为客户端期望的另一个接口,可以使不兼容的两个类通过 适配器,完成与现有类的交互。

Adapter 将作为一个 “代理人” 的职责

适配器模式特点:

  • 使不兼容的类可以通过Adapter进行交互
  • 提升了现有系统的可用性(一个类可以使多个类使用)

很常见的一个例子,数据使一个结构体,而客户端需要 json, 那么 Adapter 就可以是 json.Marshual

适配器模式的组成

  • Target Interface:客户端期望的数据格式,即客户端使用的类型
  • Adapter: 接收来自客户端的调用,假设服务端类型是 Adaptee,他会将客户端的调用转换为Adaptee 类型
  • Adaptee Interface: 实际的类型,客户端想与其交互,由于类型不相同无法直接请求
  • Client: 客户端使用 Target Interface 与 Adapter 交互

代码示例

例如我们有一个Windows电脑来作为 Adaptee Interface,电脑上有各类的接口,例如USB,这两种类型是不同的,这时就需要 Adapter

client.go

type Client struct {}

func (c *Client) InsertLightningConnectorIntoComputer(com Computer) {
    fmt.Println("Client inserts Lightning connector into computer.")
    com.InsertIntoLightningPort()
}

Client interface 为Computer配置一个雷电接口

type Computer interface {
    InsertIntoLightningPort()
}

Mac PC 实现了Computer接口,这样客户端与服务端可以直接通讯

type Mac struct {}

func (m *Mac) InsertIntoLightningPort() {
    fmt.Println("Lightning connector is plugged into mac machine.")
}

windows PC 没有实现 Computer 接口,

type Windows struct{}

func (w *Windows) insertIntoUSBPort() {
    fmt.Println("USB connector is plugged into windows machine.")
}

要使 windows 也可以 使用 Lightning,那么需要适配器

type WindowsAdapter struct {
    windowMachine *Windows
}

func (w *WindowsAdapter) InsertIntoLightningPort() {
    fmt.Println("Adapter converts Lightning signal to USB.")
    w.windowMachine.insertIntoUSBPort()
}

客户端代码

package main

func main() {

    client := &Client{}
    mac := &Mac{}

    client.InsertLightningConnectorIntoComputer(mac)

    windowsMachine := &Windows{}
    windowsMachineAdapter := &WindowsAdapter{
        windowMachine: windowsMachine,
    }

    client.InsertLightningConnectorIntoComputer(windowsMachineAdapter)
}

Bridge

桥接 (Bridge) 允许将大类拆分为两个独立的层次结构(abstraction 和 implementation),桥接模式提供一个接口,来充当两个层次间的桥梁

桥接模式的特点:

本文发布于Cylon的收藏册,转载请著名原文链接~

链接:https://www.oomkill.com/2023/03/design-patterns/

版权:本作品采用「署名-非商业性使用-相同方式共享 4.0 国际」 许可协议进行许可。