本文发布于Cylon的收藏册,转载请著名原文链接~


本文记录了在 kubernetes 环境中,使用 cephfs 时当启用了 fscache 时,由于网络问题,或者 ceph 集群问题导致的整个 k8s 集群规模的挂载故障问题。

结合fscache的kubernetes中使用cephfs造成的集群规模故障

在了解了上面的基础知识后,就可以引入故障了,下面是故障产生环境的配置

故障发生环境

软件 版本
Centos 7.9
Ceph nautilus (14.20)
Kernel 4.18.16

故障现象

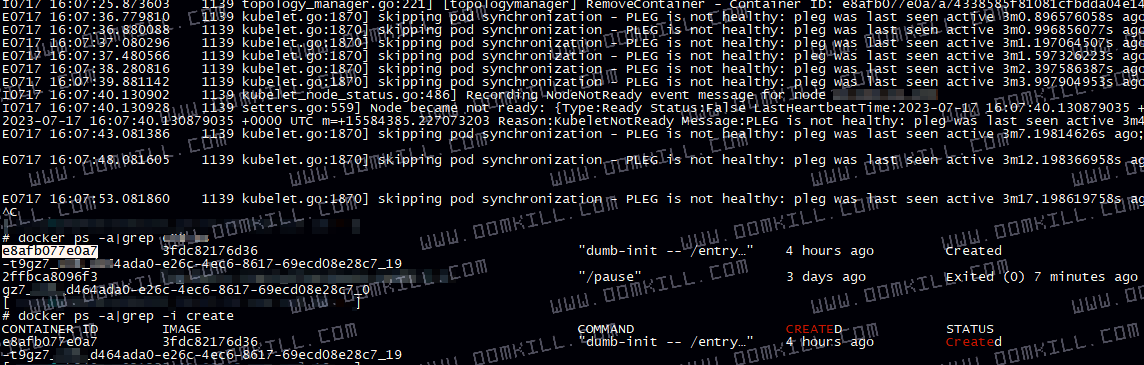
在 k8s 集群中挂在 cephfs 的场景下,新启动的 Pod 报错无法启动,报错信息如下

ContainerCannotRun: error while creating mount source path /var/lib/kubelet/pods/5446c441-9162-45e8-0e93-b59be74d13b/volumes/kubernetesio-cephfs/{dir name} mkcir /var/lib/kubelet/pods/5446c441-9162-45e8-de93-b59bte74d13b/volumes/kubernetes.io~cephfs/ip-ib file existe

主要表现的现象大概为如下三个特征

对于该节点故障之前运行的 Pod 是正常运行,但是无法写入和读取数据

无法写入数据 permission denied

image-202410914165711395

无法读取数据

image-202410914162323295

kublet 的日志报错截图如下

image-202410914112451395

彻底解决方法

需要驱逐该节点上所有挂在 cephfs 的 Pod,之后新调度来的 Pod 就可以正常启动了

故障的分析

当网络出现问题时,如果使用了 cephfs 的 Pod 就会出现大量故障,具体故障表现方式有下面几种

  • 新部署的 Pod 处于 Waiting 状态

  • 新部署的 Pod 可以启动成功,但是无法读取 cephfs 的挂载目录,主要故障表现为下面几种形式:

    • ceph mount error 5 = input/output error [3]
    • cephfs mount failure.permission denied
  • 旧 Pod 无法被删除

  • 新部署的 Pod 无法启动

注:上面故障引用都是在网络上找到相同报错的一些提示,并不完全切合本文中故障描述

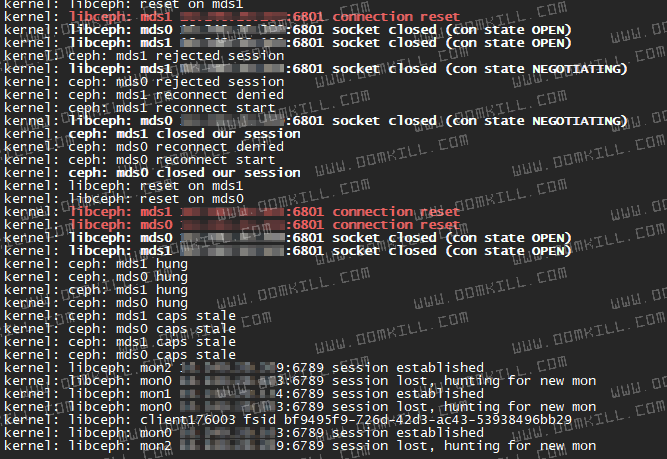
去对应节点查看节点内核日志会发现有下面几个特征

image-20241091412343242

图1:故障发生的节点报错

image-202410914112309809

图2:故障发生的节点报错

image-202410914312554309

图3:故障发生的节点报错
[ 1815.029831] ceph: mds0 closed our session
[ 1815.029833] ceph: mds0 reconnect start
[ 1815.052219] ceph: mds0 reconnect denied
[ 1815.052229] ceph:  dropping dirty Fw state for ffff9d9085da1340 1099512175611
[ 1815.052231] ceph:  dropping dirty+flushing Fw state for ffff9d9085da1340 1099512175611
[ 1815.273008] libceph: mds0 10.99.10.4:6801 socket closed (con state NEGOTIATING)
[ 1816.033241] ceph: mds0 rejected session
[ 1829.018643] ceph: mds0 hung
[ 1880.088504] ceph: mds0 came back
[ 1880.088662] ceph: mds0 caps renewed
[ 1880.094018] ceph: get_quota_realm: ino (10000000afe.fffffffffffffffe) null i_snap_realm
[ 1881.100367] ceph: get_quota_realm: ino (10000000afe.fffffffffffffffe) null i_snap_realm
[ 2046.768969] conntrack: generic helper won't handle protocol 47. Please consider loading the specific helper module.
[ 2061.731126] ceph: get_quota_realm: ino (10000000afe.fffffffffffffffe) null i_snap_realm

故障分析

由上面的三张图我们可以得到几个关键点

  1. connection reset
  2. session lost, hunting for new mon
  3. ceph: get_quota_realm()
  4. reconnection denied
  5. mds1 hung
  6. mds1 caps stale

这三张图上的日志是一个故障恢复的顺序,而问题节点(通常为整个集群 Node)内核日志都会在刷 ceph: get_quota_realm() 这种日志,首先我们需要确认第一个问题,ceph: get_quota_realm() 是什么原因导致,在互联网上找了一个 linux kernel 关于修复这个问题的提交记录,通过 commit,我们可以看到这个函数产生的原因

get_quota_realm() enters infinite loop if quota inode has no caps. This can happen after client gets evicted. [4]

这里可以看到,修复的内容是当客户端被驱逐时,这个函数会进入无限 loop ,当 inode 配额没有被授权的用户,常常发生在客户端被驱逐。

通过这个 commit,我们可以确定了后面 4 - 6 问题的疑问,即客户端被 ceph mds 驱逐(加入了黑名单),在尝试重连时就会发生 reconnection denied 接着发生陈腐的被授权认证的用户 (caps stale)。接着由于本身没有真实的卸载,而是使用了一个共享的 cookie 这个时候就会发生节点新挂载的目录是没有权限写,或者是 input/output error 的错误,这些错误表象是根据不同情况下而定,比如说被拉黑和丢失的会话。

kubelet的错误日志

此时当新的使用了 volumes 去挂载 cephfs时,由于旧的 Pod 产生的工作目录 (/var/lib/kubelet) 下的 Pod 挂载会因为 cephfs caps stale 而导致无法卸载,这是就会存在 “孤儿Pod”,“不能同步 Pod 的状态”,“不能创建新的Pod挂载,因为目录已存在”。

kubelet 日志如下所示:

kubelet_volumes.go:66] pod "5446c441-9162-45e8-e11f46893932" found, but error stat /var/lib/kubelet/pods/5446c441-9162-45e8-e11f46893932/volumes/kubernetes.io~cephfs/xxxxx: permission denied occurred during checking mounted volumes from disk

pod_workers.go:119] Error syncing pod "5446c441-9162-45e8-e11f46893932" ("xxxxx-xxx-xxx-xxxx-xxx_xxxxx(5446c441-9162-45e8-e11f46893932)", skipping: failed to "StartContainer" for "xxxxx-xxx-xxx" with RunContainerError: "failed to start container \"719346531es654113s3216e1456313d51as132156\": Error response from daemon: error while createing mount source path '/var/lib/kubelet/pods/5446c441-9162-45446c441-9162-45e8-e11f46893932/volumes/kubernetes.io~cephfs/xxxxxx-xx': mkdir /var/lib/kubelet/pods/5446c441-9162-45446c441-9162-45e8-e11f46893932/volumes/kubernetes.io~cephfs/xxxxxx-xx: file exists"

问题复现

操作步骤,手动删除掉这个节点的会话复现问题:

操作前日志

Nov 09 15:16:01 node88.itnet.com kernel: libceph: mon0 192.168.20.299:6789 session established
Nov 09 15:16:01 node88.itnet.com kernel: libceph: mon0 192.168.20.299:6789 socket closed (con state OPEN)
Nov 09 15:16:01 node88.itnet.com kernel: libceph: mon0 192.168.20.299:6789 session lost, hunting for new mon
Nov 09 15:16:01 node88.itnet.com kernel: libceph: mon1 10.240.20.134:6789 session established
Nov 09 15:16:01 node88.itnet.com kernel: libceph: client176873 fsid bf9495f9-726d-42d3-ac43-53938496bb29

步骤一:查找客户端id

$ ceph tell mds.0 client ls|grep 22.70
2023-11-09 18:07:37.063 7f204dffb700  0 client.177035 ms_handle_reset on v2:192.168.20.299:6800/1124232159
2023-11-09 18:07:37.089 7f204effd700  0 client.177041 ms_handle_reset on v2:192.168.20.299:6800/1124232159
                "addr": "10.240.22.70:0",
        "inst": "client.176873 v1:10.240.22.70:0/144083785",

步骤二:驱逐该客户端

[ root@node209 18:08:21 Thu Nov 09 ~ ] 
#ceph tell mds.0 client evict id=176873
2023-11-09 18:09:13.726 7fc3cffff700  0 client.177074 ms_handle_reset on v2:192.168.20.299:6800/1124232159
2023-11-09 18:09:14.790 7fc3d97fa700  0 client.177080 ms_handle_reset on v2:192.168.20.299:6800/1124232159

步骤三:检查客户端

查看日志,与 Openstack 全机房故障出现时日志内容一致

Nov 09 18:09:14 node88.itnet.com kernel: libceph: mds0 192.168.20.299:6801 socket closed (con state OPEN)
Nov 09 18:09:16 node88.itnet.com kernel: libceph: mds0 192.168.20.299:6801 connection reset
Nov 09 18:09:16 node88.itnet.com kernel: libceph: reset on mds0
Nov 09 18:09:16 node88.itnet.com kernel: ceph: mds0 closed our session
Nov 09 18:09:16 node88.itnet.com kernel: ceph: mds0 reconnect start
Nov 09 18:09:16 node88.itnet.com kernel: ceph: mds0 reconnect denied

Nov 09 18:09:20 node88.itnet.com kernel: libceph: mds0 192.168.20.299:6801 socket closed (con state NEGOTIATING)
Nov 09 18:09:21 node88.itnet.com kernel: ceph: mds0 rejected session
Nov 09 18:09:21 node88.itnet.com kernel: ceph: mds1 rejected session
Nov 09 18:09:21 node88.itnet.com kernel: ceph: get_quota_realm: ino (10000000006.fffffffffffffffe) null i_snap_realm

Nov 09 18:15:21 node88.itnet.com kernel: ceph: get_quota_realm: ino (10000000006.fffffffffffffffe) null i_snap_realm
Nov 09 18:21:21 node88.itnet.com kernel: ceph: get_quota_realm: ino (10000000006.fffffffffffffffe) null i_snap_realm
Nov 09 18:27:22 node88.itnet.com kernel: ceph: get_quota_realm: ino (10000000006.fffffffffffffffe) null i_snap_realm
Nov 09 18:33:22 node88.itnet.com kernel: ceph: get_quota_realm: ino (10000000006.fffffffffffffffe) null i_snap_realm
Nov 09 18:39:23 node88.itnet.com kernel: ceph: get_quota_realm: ino (10000000006.fffffffffffffffe) null i_snap_realm
Nov 09 18:45:23 node88.itnet.com kernel: ceph: get_quota_realm: ino (10000000006.fffffffffffffffe) null i_snap_realm
Nov 09 18:51:24 node88.itnet.com kernel: ceph: get_quota_realm: ino (10000000006.fffffffffffffffe) null i_snap_realm
Nov 09 18:57:24 node88.itnet.com kernel: ceph: get_quota_realm: ino (10000000006.fffffffffffffffe) null i_snap_realm

问题如何解决

首先上面我们阐述了问题出现背景以及原因,要想解决这些错误,要分为两个步骤:

  1. 首先驱逐 Kubernetes Node 节点上所有挂载 cephfs 的 Pod,这步骤是为了优雅的结束 fscache 的 cookie cache 机制,使节点可以正常的提供服务
  2. 解决使用 fscache 因网络问题导致的会话丢失问题的重连现象

这里主要以步骤2来阐述,解决这个问题就是通过两个方式,一个是不使用 fscache,另一个则是不让 mds 拉黑客户端,关闭 fscache 的成本很难,至今没有尝试成功,这里通过配置 ceph 服务使得 ceph mds 不会拉黑因出现网络问题丢失连接的客户端。

ceph 中阐述了驱逐的概念 “当某个文件系统客户端不响应或者有其它异常行为时,有必要强制切断它到文件系统的访问,这个过程就叫做驱逐。” [5]

问题的根本原因为:ceph mds 把客户端拉入了黑名单,缓存导致客户端无法卸载连接,但接入了 fscache 的概念导致旧 session 无法释放,新连接会被 reject。

要想解决这个问题,ceph 提供了一个参数来解决这个问题,mds_session_blacklist_on_timeout

It is possible to respond to slow clients by simply dropping their MDS sessions, but permit them to re-open sessions and permit them to continue talking to OSDs. To enable this mode, set mds_session_blacklist_on_timeout to false on your MDS nodes. [6]

最终在配置后,上述问题解决

解决问题后测试故障是否存在

测试过程

ceph 参数的配置

image-20241091412343123

图4:故障发生的节点报错

操作驱逐 xx.70 的客户端连接,用以模拟 ceph 运行的底层出现故障而非正常断开 session 的场景

image-20241091412343123

图5:驱逐客户端的操作

重新运行 Pod 检查 session 是缓存还是会重连

image-2024109141123756109

图6:检查节点日志

附:ceph mds 管理客户端

查看一个客户端的连接

ceph daemon mds.xxxxxxxx session ls |grep -E 'inst|hostname|kernel_version'|grep xxxx
        "inst": "client.105123 v1:192.168.0.0:0/11243531",
            "hostname": "xxxxxxxxxxxxxxxxxx"

手动驱逐一个客户端

ceph tell mds.0 client evict id=105123
2023-11-12 13:25:23:381 7fa3a67fc700 0 client.105123 ms_handle_reset on v2:192.168.0.0:6800/112351231
2023-11-12 13:25:23:421 7fa3a67fc700 0 client.105123 ms_handle_reset on v2:192.168.0.0:6800/112351231

查看 ceph 的配置参数

ceph config dump
WHO     MASK  LEVEL     OPTION                                VALUE RO
  mon         advanced  auth_allow_insecure_global_id_reclaim false
  mon         advanced  mon_allow_pool_delete                 false
  mds         advanced  mds_session_blacklist_on_evict        false
  mds         advanced  mds_session_blacklist_on_timeout      false

当出现问题无法卸载时应如何解决?

当我们遇到问题时,卸载目录会出现被占用情况,通过 mount 和 fuser 都无法卸载

umount -f /tmp/998
umount: /tmp/998: target is buy.
        (In some cases useful info about processes that use th device is found by losf(8) or fuser(1))
        the device is found by losf(8) or fuser(1)
        
fuser -v1 /root/test
Cannot stat /root/test: Input/output error

这个时候由于 cephfs 挂载问题会导致整个文件系统不可用,例如 df -h, ls dir 等,此时可以使用 umount 的懒卸载模式 umount -l,这会告诉内核当不占用时被卸载,由于这个问题是出现问题,而不是长期占用,这里用懒卸载后会立即卸载,从而解决了 stuck 的问题。

什么是fscache

fscache 是网络文件系统的通用缓存,例如 NFS, CephFS都可以使用其进行缓存从而提高 IO

FS-Cache是在访问之前,将整个打开的每个 netfs 文件完全加载到 Cache 中,之后的挂载是从该缓存而不是 netfs 的 inode 中提供

fscache主要提供了下列功能:

  • 一次可以使用多个缓存
  • 可以随时添加/删除缓存
  • Cookie 分为 “卷”, “数据文件”, “缓存”
    • 缓存 cookie 代表整个缓存,通常不可见到“网络文件系统”
    • 卷 cookie 来表示一组 文件
    • 数据文件 cookie 用于缓存数据

下图是一个 NFS 使用 fscache 的示意图,CephFS 原理与其类似

Cache-NFS-Share-Data-with-FS-Cache-1

图7:FS-Cache 架构
Source:https://computingforgeeks.com/how-to-cache-nfs-share-data-with-fs-cache-on-linux/

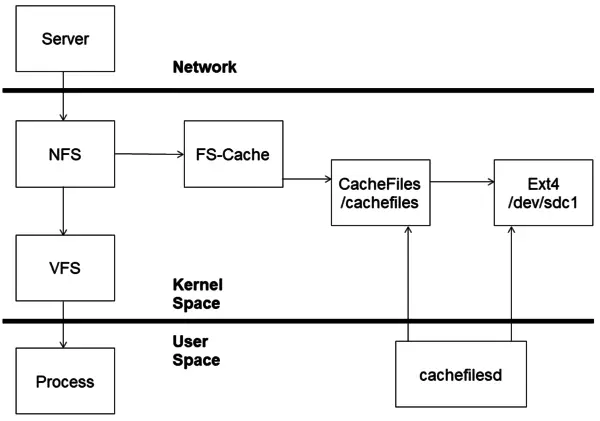
CephFS 也是可以被缓存的一种网络文件系统,可以通过其内核模块看到对应的依赖

root@client:~# lsmod | grep ceph
ceph                  376832  1
libceph               315392  1 ceph
fscache                65536  1 ceph
libcrc32c              16384  3 xfs,raid456,libceph
root@client:~# modinfo ceph
filename:       /lib/modules/4.15.0-112-generic/kernel/fs/ceph/ceph.ko
license:        GPL
description:    Ceph filesystem for Linux
author:         Patience Warnick <patience@newdream.net>
author:         Yehuda Sadeh <yehuda@hq.newdream.net>
author:         Sage Weil <sage@newdream.net>
alias:          fs-ceph
srcversion:     B2806F4EAACAC1E19EE7AFA
depends:        libceph,fscache
retpoline:      Y
intree:         Y
name:           ceph
vermagic:       4.15.0-112-generic SMP mod_unload
signat:         PKCS#7
signer:        
sig_key:       
sig_hashalgo:   md4

在启用了fs-cache后,内核日志可以看到对应 cephfs 挂载时 ceph 被注册到 fscache中

[  11457.592011] FS-Cache: Loaded
[  11457.617265] Key type ceph registered
[  11457.617686] libceph: loaded (mon/osd proto 15/24)
[  11457.640554] FS-Cache: Netfs 'ceph' registered for caching
[  11457.640558] ceph: loaded (mds proto 32)
[  11457.640978] libceph: parse_ips bad ip 'mon1.ichenfu.com:6789,mon2.ichenfu.com:6789,mon3.ichenfu.com:6789'

当 monitor / OSD 拒绝连接时,所有该节点后续创建的挂载均会使用缓存,除非 umount 所有挂载后重新挂载才可以重新与 ceph mon 建立连接

cephfs 中的 fscache

ceph 官方在 2023年11月5日的一篇博客 [1] 中介绍了,cephfs 与 fscache 结合的介绍。这个功能的加入最显著的成功就是 ceph node 流向 OSD 网络被大大减少,尤其是在读取多的情况下。

这个机制可以在代码 commit 中看到其原理:“在第一次通过文件引用inode时创建缓存cookie。之后,直到我们处理掉inode,我们都不会摆脱cookie” [2]

Reference

[1] First Impressions Through Fscache and Ceph

[2] ceph: persistent caching with fscache

[3] Cannot Mount CephFS No Timeout, mount error 5 = Input/output error

[4] ceph: fix infinite loop in get_quota_realm()

[5] Ceph 文件系统客户端的驱逐

[6] advanced-configuring-blacklisting

本文发布于Cylon的收藏册,转载请著名原文链接~

链接:https://www.oomkill.com/2023/11/10-1-ceph-fscache/

版权:本作品采用「署名-非商业性使用-相同方式共享 4.0 国际」 许可协议进行许可。